Happy Friday, friends!
It’s been a whirlwind few weeks, and I feel like I have barely been keeping up, let alone finding time to do things like properly tell you about the new job I started almost two months ago instead of just hinting around about it and never updating (soon, I promise!) A book deal came close on the heels (like, in the same 24 hour period) of the job offer, and life has been very full since.
One thing I have managed to find time for in the past couple of months - rather inexplicably, I suppose, but I’ll take - is crafting and creating.
I love the idea of making holiday gifts and decor, but I also have a tendency to spend all my time over-thinking or just watching other people doing projects on Instagram, and then not actually get around to making anything myself.
But this year has been different. It’s been like therapy, actually, this opportunity to slow down and make something with my hands: one of the best parts in what can otherwise be a hectic season, and definitely in line with the slower lifestyle I’m trying to cultivate.
In this week’s episode of The Tea’s Made podcast, above, I shared four simple projects (3 that I’ve done this year, one that I have in the past and plan to do again).
Below, you’ll find links to materials, project tutorials, and more - just in time for a last-week-before-Christmas crafting sesh.
Easy Embroidery:
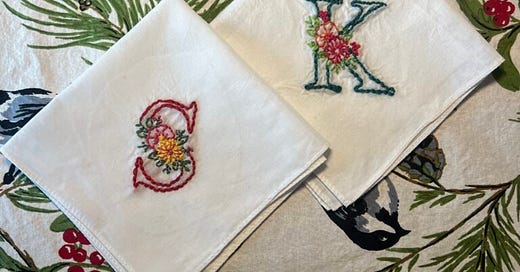
Check out the cute personalized hankies I made! Each took about two hours (and much of that time was in the French knots.) Here are some cute monogram letters in case you want to try the stick-and-stitch method. I also love these nature-themed iron-on designs and have made many tea towels with them.
You can also create your own embroidery designs with the following supplies:
Method 1: Create your own design on Canva or in another program. Remember that your design will be reversed once transferred to the fabric, so flip it if necessary. Print the design and trace it onto tracing paper. Then place a piece of carbon transfer paper, carbon side down, on your fabric. Place the tracing paper on top and use a tracing tool or other dull tool to trace over the design. Use a firm hand to be sure the entire design transfers onto the fabric.
Method 2: Using carbon paper, transfer your traced design onto Sulky Stick & Stitch adhesive stabilizer. Cut out the design and stick to your fabric in your desired position. Stitch through the stabilizer, and when your project is complete, the sticker will easily wash away with a little warm water.
I also use Sulky Tender Touch Iron-On Backing to cover the back side of my design to keep it from unraveling.
DIY Beeswax Wraps
For this project, you’ll need beeswax pastilles, parchment paper, thin cotton cloth (I used a vintage tea towel, but muslin would work just fine too) a cookie sheet, and a paintbrush. Cover cookie sheet with parchment paper and lay your fabric on top, then sprinkle the beeswax pellets on the fabric, making sure to get some near the edges.
Put in the oven for 5-10 minutes, or until the wax is completely melted and soaking into the cloth. Remove from the oven and use the paintbrush to spread the wax evenly all over the cloth, then pick it up and wave it back and forth a few times to start the cooling process.
After this you can hang it up with clothes pins to dry, or find a place to drape it where you don’t mind a little beeswax residue (I spread mine over a cardboard box.) For a more complete tutorial with photos check out this blog post.
Dried Citrus Garland
Slice citrus fruit (as evenly as possible, 1/4″ – 1/8″ thick) and dry either in the oven on cookie sheets at 170-200 degrees, turning every 1-2 hours, or in a food dehydrator (expect it to take 8-12 hours or more in the food dehydrator, 3-5 hours in the oven, depending on the thickness of the slices and the temperature of the oven.
Placing the slices on cooling racks in the oven will help speed up the dry time.) When dry, thread citrus slices onto jute twine with an embroidery needle, or just poke a hole in each slice with a pin or paper clip and thread the twine through. I interspersed my citrus (oranges and grapefruit) with stars cut from gold card stock.
Homemade Vanilla Extract:
A super-simple (and tasty) project that’s easy to make in bulk and great for gifting. Cut vanilla bean pods in half lengthwise and trim ends to make sure they will fit in your container, like these clear glass bottles with hanging tags or these amber bottles with pre-designed stick-on tags.
If you like, scrape the seeds out of the inside of the pod with a spoon and place in the bottle or jar. This is an optional step but may lead to the vanilla being ready to use sooner and/or having a stronger flavor. Plus, it’s fun!
Cover with spirits of at least 80 proof (40% alcohol.) Vodka is traditional but if you’ve got a bottle of bourbon or rum wasting away in the back of your liquor cabinet, it could be fun to try it out. Use about 5-6 beans per cup of spirits.
Are you crafting this holiday? I’d love to hear about what you’re making in the comments.